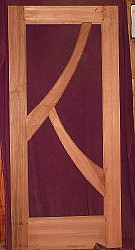
This Entrance Door is called
The Terrace View Entry
It is VG Redwood 36" x 80" x 1-3/4"
This "free form" shaped door has
Seedy Reamy glass in the top panel and
VG Redwood panels below
.

101.jpg
102.jpg
103.jpg
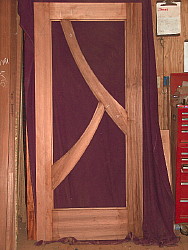
Here is the completed Terrace View Door
The panels are VG Old Growth Redwood
and so are the door styles

104.jpg
105.jpg
106.jpg
Here is the future home of this beautiful door
The glass is Seedy Reamy over clear.
It is tempered and insulated
The detailing is hand shaped ...... every single piece

107.jpg
108.jpg
109.jpg
The panels are hand shaped .... and the glass reminds one of the antique hand poured glass.
The panels are are solid old Growth Redwood that is vertical grain and are over 1-1/2" thick and the boards continue from bottom to top.
The stops were steam bent and hand fitted ......... one by one


Below is the provenance of the making of this beautiful door
202.jpg
202a.jpg
203.jpg
I worked from a picture of a door I made 20 years ago
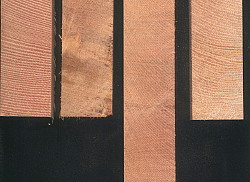
here is the fine grained VG Redwood sawn from old logs left on the forest floor over 100 year ago
I picked continuos pieces and determined the angles

204.jpg
205.jpg
206.jpg
I cut the pieces to length then shape the ends before shaping
the process of coping
here is my concept starting out

207.jpg
208.jpg
209.jpg
that looks very nice
Then I cut the piece on the band saw
nice curves !!

210.jpg
211.jpg
212.jpg
ooops same picture
then I hand plane with my antique compass plane ........ to a perfect shape
then I work on the out side

213.jpg
214.jpg
215.jpg
ahhh ........... that looks just right !!
now I'll start on the lower piece
sketch out my idea

216.jpg
217.jpg
218.jpg
then calculate the angles
cope the piece and cut out on the band saw.
after shaping pieces, I attach blocks to help me glue up the door

219.jpg
220.jpg
221.jpg
here we are cleaning the joints
clamping on the curved piece
how is this for a "tricky" glue up !!

222.jpg
223.jpg
224.jpg
and every joint fits perfectly
the glue up of only 6 pieces took longer the a larger multi-piece door
added blocks gave me the "leverage" to get a curve rail joined to the style

225.jpg
226a.jpg
226b.jpg
The door will stay in clamps for 4 days to cure and harden
a view of the inside
a view of the outside

227.jpg
228.jpg
229.jpg
here I'm making a template for the glass supplier
here I'm laying out the planks that will make the panels for this beautiful door
the vertical grain Redwood planks are doweled and glued ....... where they will remain in clamps for at least 72 hours

230.jpg
231.jpg
232.jpg
here they are out of clamps .... now .... one solid plank
then I cut them into oversize future panels
The we sanded them our dimensional sander

233.jpg
234.jpg
235.jpg
pass after pass
until they are finished to a furniture grade finish
then I cut each panel to fit into each opening .......... leaving a quarter of an inch for panel expansion

236.jpg
237.jpg
238.jpg
then hand shaped smooth to the perfect curve
nice fit !!
Then the panels are rebated

239.jpg
240.jpg
241.jpg
and the tongue is created
a finished panel
the door is machine sanded to a furniture grade finish

242.jpg
243.jpg
244.jpg
... and sanded
then each molded detail are hand sanded
here is the finished door ready for the first coat of our varnish oil

245.jpg
246.jpg
247.jpg
each of our doors receive 4 coats of varnish oil
and we sand the panels to the same fine finish ............ by hand
......... and by fine finishing sanders

248.jpg
249.jpg
250.jpg
ready for oil
here are both panels after their last coat of oil
here is Zoey finish sanding the Redwood jambs

251.jpg
252.jpg
253.jpg
here they are being oiled
here is my steam box in which I steam and then bend the stops to fit the door
here are the stops being oiled

254.jpg
255.jpg
256.jpg
the panels are caulked and the stops are fitted
it took several hours to fit the stops ..... but ......... it is worth it !!
the glass was mis-made first time around ........ still can't figure out how the did this.

257.jpg
but then they got it right

Return to Gallery

Return to Works in Progress