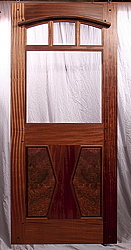
This beautiful door is called
The Seabeck Entry Door
It is Vertical Grain Ribbon Mahogany
with Old Growth Redwood Burl Panels
It also has Walnut mortise pins and a Mahogany Eyebrow
This door is 42" x 94" x 1-3/4
and glass art by
Lisa Stirrett in the lites

101.jpg
102.jpg
102a.jpg

The Seabeck Entry Project Door.
The original drawing.
Just Grand.
103.jpg
105.jpg
104.jpg

This is the view from the new home of the Seabeck Entry Door.
What Beautiful Ribbon Grain Mahogany.
The soon to be completed new home.

106.jpg
107.jpg
108.jpg

These Burl Panels will grace the door with such Beauty.
With the Ribbon Grain in the wood used in this door and the Redwood Burl Panels , this door is sure to stand out.
Look at the shine!
109.jpg
110.jpg
111.jpg
A closer look........
and yet another close look.
So much detail to look at!

112.jpg
So much beauty in the grain of the lumber used in the wood.

Below is the provenance of the making of The Seabeck Entry Door
202.jpg
102.jpg
203.jpg
These pieces of wood for the door are being run through the planer.
The original drawing
Here the side rails are being joined.

RETURN
204.jpg
205.jpg
206.jpg
Marking the door for the bow shape that will be cut.
207.jpg
208.jpg
209.jpg
Brian is hand shaping the curved top rail.
He uses many hand tools as well as his machines.

210.jpg
211.jpg
212.jpg
We even use clamps in the fitting of the door.

213.jpg
214.jpg
215.jpg

The cutting of the bow has begun.
Brian show's great attention to detail.
Even in this day and age of many machine's, Brian still find's quite often that hand tool's are the only way to get just the right angle or fit that he is looking for.
216.jpg
217.jpg
218.jpg
The complexity of this door show's in the design.
Just about ready to make the final fit.

219.jpg
220.jpg
221.jpg

Here we are gluing up the door
The cleaning up of the door after gluing is very important too.
Here are the templets for the door.
222.jpg
223.jpg
224.jpg
All glued up and cured after sitting for 72 hour's.
Book matched panels to be used in the panels of this door.
Gluing up of the panels.

225.jpg
226.jpg
227.jpg
Trimming off the glue from the cured panels.
We thought the look of the dried glue was worth a photo.
Here I am machine hand sanding the door flat before getting into the fine detail sanding.

228.jpg
229.jpg
230.jpg
What a beautiful tight fit. Brian always amazes me at his skill's in making a door.
His choice of wood's, the pattern's in the wood are astonishing.
Here I begin the hand sanding, a very time consuming task.

231.jpg
232.jpg
233.jpg
Machining the edge of the panel.
Trimming off a dowle.

234.jpg
235.jpg
236.jpg
So Beautiful and just about ready to be oiled.
Look at the beautiful grain in this door
Here I am going back over the panels with a 3rd and final finer grit of paper.

237.jpg
238.jpg
239.jpg
Hand sanding the edge's of the panel.
The oiling process has started.
Under the Canopy of The Redwoods!

240.jpg
241.jpg
242.jpg
After each oiling the panels hang to dry for 3 days.
Here process of making the Eyebrow begins.
This is like a press to bend and curve the wood into the shape of the Eyebrow.

243.jpg
244.jpg
245.jpg
I believe we have achieved the curve we were looking for.
The door is ready for it's first oiling.

246.jpg
247.jpg
248.jpg
Wow! Look at how the rays in this door shine.
Here the door will hang for 3 day's before being oiled again. That process will repeat itself for 3 more time's.
Boring for the hinges.

249.jpg
250.jpg
251.jpg
Looks great!
These hinges fit just right.
Brian is branding the door. We have had some clients who have asked for the brand to be on the side without hinges so it could be seen.

252.jpg
253.jpg
254.jpg
Steaming stop's to get the curve necessary to fit the curve in the door.
Here the steamed stop's will be clamped in to dry.
Looks like a good curve to fit this lovely

255.jpg
256.jpg
257.jpg
Oiling the stops.
Drying the stops.
Putting in the pins.

258.jpg
259.jpg
260.jpg
Each pin is hand fitted
Time to fit the stops.
Very complex door, with all the angles involved.

261.jpg
262.jpg
263.jpg
The panels are being set in the door for a permeant fit.
Here Brian is getting ready to fit the Eyebrow on the door.
Tight fit Glen.

RETURN