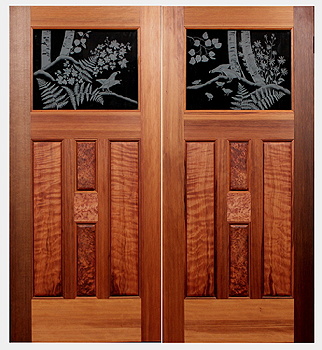
This Entry project is called
The Quail Meadows Entry
Here is a pair of old growth VG Redwood Doors
with Curly and Burl book matched Redwood panels.
They are each 36" x 80" x 1-3/4" thick
and they have etched & carved seen of Quails in a forest meadow
by Cynthia Myers

Here is the pair of completed doors .... They match up well


102.jpg

103.jpg

104.jpg
This is the left door

and here's the right door

All of the panels are "book matched" to each other, on both sides of each door.


Click on Any Image to Enlarge

105.jpg

106.jpg

107.jpg
The panels are curly Redwood on the outside panels

and the center top and bottom panels are Redwood burl

here is a close-up of the burl ....... upper


108.jpg

109.jpg

110.jpg
and here is the lower burl panel

the contrasting grain patterns are a feast for the eyes, both in their texture and their patterns

a closer look


111.jpg

112.jpg

113.jpg
here is a close-up of the two Redwood grains

Here is a close up of the left etched glass

and here is a close up of the light etched window


114.jpg

115.jpg

116.jpg
Please notice the shading and detail in this scene

each image has detailing and texture

the detailing is amazing


The glass is Etched and Carved by Cynthia Myers

117.jpg

119.jpg

118.jpg
Please look at this close-up and the details

this is done on tempered and insulated glass units

Notice the shading in the Birch bark.


Below is the provenance of the making of these beautiful doors !
201.jpg

202.jpg
Here is the entry before the new doors

and my drawing of the door(s) layout


203.jpg

204.jpg

205.jpg
Here is the drawing overlaid on the entry

here Zoey colored in the stick drawings

I've scanned the end grain to show you how dense and tight the VG Old Growth Redwood is


206.jpg

207.jpg

208.jpg
Here is the rough lumber being joined and surfaced

then I lay out the sticks

the cut to size to be marked for mortising


209.jpg

210.jpg

211.jpg
I use spacers so that all of the rails are equidistant

here we are gluing up the door

we clamp them on both sides for equal pressure


212.jpg

213.jpg

213a.jpg
We toothbrush the excess glue from the corners

then after all is cleaned we....we lay the door on the floor where it will lay for 72

another view


213b.jpg

214.jpg

215.jpg
Here is the door out of clamps

we machine each side

and sand some more


216.jpg

217.jpg

218.jpg
both sides

here are the panel sub-states edged with Redwood

here is my grandson Sully "catching" veneers from our dimensional sander

219.jpg

220.jpg

221.jpg
here we are mortising for the hinges

and here the panels are in the vacuum press, where they will stay under pressure for 2-1/2 days

here are the beautiful panels being sanded


222.jpg

223.jpg

224.jpg
more panels being "rough" sanded

then after matching for the rebate, each panel is sided

we write on each panel the grit of sandpaper that we just used on that panel


225.jpg

226.jpg

227.jpg
Each curly wood panel is bookmatched

here we sand the bevel on the panel

sand and sand .... doors are furniture too!


228.jpg

229.jpg

230.jpg
we even hand sand the chamfer on each panels

ready to oil

here are the long panels


231.jpg

232.jpg

233.jpg
here are the burl panels about to be oiled

we oil under the Redwoods

here is the first coat of oil on the curly Redwood panels


236.jpg

237.jpg

238.jpg
and here is the varnish oil on the Redwood burl

such beautiful wood

amazing


239.jpg

240.jpg

241.jpg
here I am signing our work

and it "smokes"

I am proud of our efforts


242.jpg

243.jpg

244.jpg
and now we oil the door

4 different times with our varnish oil

letting each piece cure for 2-3 days


245.jpg

and here is the finished product with the beautiful etched glass by Cythia Myers


Return to Door Gallery


RETURN to Doors in Progress