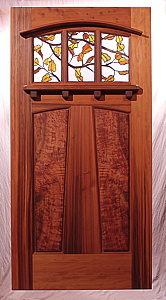
This beautiful entrance door is called
The Entradero House Entry Door
It is made of solid vertical grain Old Growth Redwood
It is 42" x 84" x 1-3/4"
It has birds-eye burl panels
with a Redwood Dentil shelf

with stained glass by
Zoleta Lee Designs

This beautiful door is a symphony of grain, textures, and colors.
The vertical grain door frames the complex burl panels,
and the Tiffany Style stained glass displays the season of Fall.

102.jpg
103.jpg
105.jpg
The eyebrow adds adds a unique design detail that has been innovated and perfected by a hardworking craftsman at Mendocino Doors
The stained glass was designed by the client and Zoleta Lee Designs
Here is a backlit view of the stylized Autumn leaves

106.jpg
Please Click on Any Image to Enlarge
107.jpg
The panels are a quilted, curly, and "birds-eye" Redwood
Here is a close-up of the beautiful panels

107a.jpg
108.jpg
109.jpg
Here is a close-up of the Dentil Shelf
Here is a front view of the Dentil Shelf
The shelf is attached with stainless steel screws and capped with a Rosewood diamond cap

109a.jpg
110.jpg
111.jpg
Zoeys stained glass is actually encased in a clear tempered glass insulated unit
Looking down and seeing the door from another view
........... one hot door !!


Here is the provenance of the making of this beautiful custom Entry Door
201.jpg
202.jpg
203.jpg
Here is the final drawing ........... how'd I do?
Here is the door after its' first oiling
We made the jambs long before I started the door ......... no problem

204.jpg
205.jpg
205a.jpg
so I shipped them off to be installed while we made their beautiful door
and it's off to the clients new home
here is a scanned image of the end grain, showing the vertical grain of the Redwood used to make the Entradero door.

206.jpg
207.jpg
208.jpg
the rough lumber is straightened, flattened, then planed
I made a template for the gentle arc
then used the band saw to cut it out

209.jpg
210.jpg
211.jpg
I cut the top and the mid-rail to the same arc
the used my 100 year old compass plane to shape the final arc
here I fit the final pieces

212.jpg
213.jpg
214.jpg
then we flatten and clamp up the door
and clean all the excess glue and "tooth brush" the corners
the door will stay in clamps for at least three full days.

215.jpg
216.jpg
217.jpg
nice tight joints !
here I am making templates for the stained glass
and signing my our next door

218.jpg
219.jpg
220.jpg
with pride
we oil our door frames four different times before we add the panels
and the varnish oil brings the wood to life

221.jpg
222.jpg
223.jpg
here we are are rough sanding the bookmatched panels
then shaping and adding the chamfered bevel
and Sun Ray finishes the panels to a furniture grade finish

224.jpg
225.jpg
226.jpg
and hand sanding the chamfer detail
what an "electric" grain
here are the book matched panels, before our varnish oil

227.jpg
228.jpg
229.jpg
and here we apply the varnish oil
we oil the panels 3 to 4 times
each coat cures at least 3 days

230.jpg
231.jpg
232.jpg
Here I am making the eyebrow. It is bent laminated Redwood
and here is the finished product
time to start putting it all together

233.jpg
234.jpg
235.jpg
I'm adding the Rosewood pins to suspend the eyebrow off of the door
here is where the "eyebrow" mounts to the door
and we oil the "eyebrow" and dentil shelf at least 3 times with Our varnish oil

236.jpg
237.jpg
238.jpg
Now it's time to cut a fit the curved stops
first we figure the angle
then cut each stop individually for a perfect fit

239.jpg
240.jpg
241.jpg
each panel floats behind the stop and is free to move on its' own
we caulk the panels with a clear drying siliconized latex caulking
the templates fit well ......... where is the glass?

241a.jpg
241b.jpg
241c.jpg
Here Zoey designs the glass for the clients approval
from this drawing
........ to this beautiful glass

241d.jpg
241e.jpg
242.jpg
here is the center panels
and the right panel
here I'm clamping the dentil posts

243.jpg
244.jpg
245.jpg
and here I'm gluing on the "eyebrow"
here are the dentil posts ready for the dentil shelf
I precut the stops while I was waiting for the glass to be insulated

246.jpg
247.jpg
248.jpg
and here they are ....... the stained glass encased in tempered glass
the right side
here are all the pieces, ready to install

249.jpg
What a beauty !!

Return To Gallery


RETURN TO WORK IN PROGRESS