|
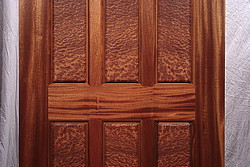
The Cliffs of Cork Entry Door It is 42" x 84" x 1-3/4" It is made of Ribbon Grain Mahogany with Book Matched Redwood Burl panels and beveled, insulated glass |
|
Here is the Completed Door |
Each panel (on both sides) is a book-match |
Another view of this beautiful door |
||
|
Click on ANY Image to Enlarge |
||||
|
Here is the drawing of the project before I started ..... "how'd I do?" |
a close-up of the book matched panels |
and closer ..... |
||
|
see the chatoyancy ..... |
and closer look with the beautiful ribbon grain Mahogany |
and closer yet !! |
||
|
|
||||
|
All of the glass is insulated and tempered ...... the out facing glass is beveled |
hard to photograph |
such lovely wood |
||
|
|
||||
|
a cool reflection on the backdrop |
what a marvelous job of fitting miters |
here is a view of the bevel |
||
|
|
||||
|
Here is the history and
photographic provenance of |
||||
|
Click on ANY Image to Enlarge |
||||
|
The Styles and mid-rails came from on piece of VG Ribbon grain Mahogany |
The top rail and bottom rail came from the same plank of Mahogany |
|||
|
|
||||
|
The grain was so figured I could not machine it with conventional tools |
....... it had to be dimensionally sanded |
The rough "blank" |
||
|
|
||||
|
laying out the top rail |
careful |
it is easier to follow the line on the tape rather then on wood |
||
|
Click on ANY Image to Enlarge |
||||
|
got it ! |
Then I hand smooth the saw kerf with Euro files |
and other tools |
||
|
|
||||
|
here the top rail is machined .... |
Laying out the equidistant rails for the splined tennons |
Then I calculated the mid-vertical rails |
||
|
|
||||
|
and started machining and fitting |
I was so exact that I made equidistant spacers to insure the process |
Ta-Da ! |
||
|
|
||||
|
Here we glue 'er up |
with 22 clamps !! |
Then we clean all of the glue |
||
|
|
||||
|
and this monster stayed in clamps for 72+ hours |
fresh out of clamps |
and the sanding begins |
||
|
Click on ANY Image to Enlarge |
||||
|
Trimming to length |
and every molded edge is hand sanded 2-3 time ...... to furniture grade |
here is the Redwood Burl we used for the panels in this door |
||
|
|
||||
|
what a beauty |
a view with a dab of water ...... electric !! |
here are the bookmatched this veneers which are 5/16" thick |
||
|
|
||||
|
Here is the panel sub-core being machined |
Here I mortised for the hinges |
and ...... signed it ! |
||
|
|
||||
|
here are the veneers, waiting to be covered in glue |
then wrapped up tight |
then they go into a vacuum press and stay under pressure for 3-4 days till the waterproof glue cures |
||
|
|
||||
|
Then they are sanded to dimension |
They are about 1-5/8" thick |
and I start to machine them |
||
|
|
||||
|
I shape and machine the panels |
a closer look |
each panel is machined ......... |
||
|
|
||||
|
and hand sanded to a furniture finish |
then the fun ........ of oiling ... WOW !! |
here is the raw door before varnish oil |
||
|
|
||||
|
and then it comes to life |
have a look !! |
Each coat (of 4) cures at least 3 days between coats |
||
|
|
||||
|
here we finish the jambs |
then oil them |
The panels are sorted and matched |
||
|
|
||||
|
then put in place |
the panels "float" and are suspended with neoprene balls |
and EACH stop is cut and hand fitted |
||
|
|
||||
|
they are caulked in place with siliconized latex |
I use this ..... because it really adhere to wood |
here is the glass units |
||
|
|
||||
|
then each stop is hand cut |
and fitted |
it is a lot of effort ... to do it right
...... |
||
|
|
||||
|
the glass also floats |
caulked in place |
....... and this baby is done !! |
||


