|
|
|
|
|

|
|

|
|

|
|
Here is the completed door
|
|
Here is a close-up of the upper half of
The Carpinteria
|
|
Here is another view of The
Carpinteria
|
|
|
|
|
|

|
|

|
|

|
|
The panels are bookmatched flat sawn curly
Old Growth redwood
|
|
Here is a close up of the Redwood
Panels
Nice ..... huh !!
|
|
The Eyebrow if bent laminated
Redwood
|
|
|
|
|
|

|
|

|
|

|
|
and the eyebrow "floats "off the door on
Mahogany pins
|
|
The dentil shelf is attached with stainless
steel screws and capped with beautiful pins of Pao
Brasil
|
|
The glass is tempered and insulated art
glass called Seedy Reamy
|
|
|
|
|
|
|
|
|
|
|
|
|
|
|
|

|

|

|

|
|
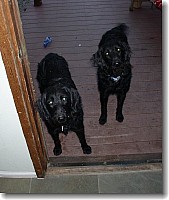
....... and here are the Boys !
|
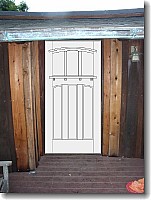
Here is a view of the drawing on the
front of the house
|
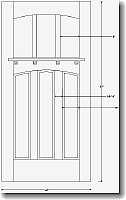
Here are the dimensions
|
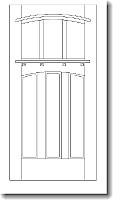
Here is a drawing of The Carpinteria
|
|
|
|
|
|
|
Here is the
History
of how this door was constructed
|
|

|

|

|

|
|
Here is the "rough stock" that will make this
door
|
Every piece is cut oversized and the joined straight
and then surfaced to thickness
|
Then cut to exact length
|
Here are some more pictures of the rough
stock
|
|
|
|
|
|

|

|

|

|
|
Here I am cutting the template for the arched top
and mid rail
|
...... and here I am dimension sanding the top and
mid rail to 1-3/4" thick
|
Then I transfer the arc to the pieces
|
Drill the top piece for the mullions and pre drill
and fill the holes with dowels ...... cool trick
|
|
|
|
|

|

|

|

|
|
Then I cut the arcs
|
and you can see the dowels that are left and after
planing they will accept machining
|
The I "smooth" the arc with a 100 year old plane,
called a compass plane because the sole is
adjustable
|
Then comes the hand sanding
|
|
|
|
|

|

|

|

|
|
Then I fit each piece ... one by one
|
... know this ..... a perfect joint does not allow
the "union" of the woods to fail
|
and I spend a lot of time making sure that each
piece fits .... "just right"
|
Then we glued up The Carpinteria and remove all the
excess glue we can
|
|
|
|
|

|

|

|

|
|
... and yes ....... scrub the corners with a
toothbrush and clean water ..... then blow off the water
with compressed air
|
Here the door will cure for at leas 3 days
|
And then we're ready to sand the door. Here Jason is
doing all of the scraping first
|
The we start machine sanding the door all the way
down to 220 grit
|
|
|
|
|

|

|

|

|
|
And of course ....... hand sand all of the molded
edging .... inch by inch
|
Then I heat up my signature
|
and place it of the hinge edge
|
This means I (we are) am proud enough to tell folks
who made this piece of fine woodworking
|
|
|
|
|

|

|

|

|
|
Not forgetting to sand the edges
|
and "back bevel" the opening edge
|
Here is the door ready to be sealed and
oiled
|
Even the inside of the panels and glass gets 4 coats
of our varnish-oil
|
|
|
|
|
|

|

|

|

|
|
... yes 4 coats and we wait at least 3-4 days
between coats
|
Here I made templates to mail of to ThermalSun
...... who will make the insulated and tempered glass
units
|
Here are the panel blanks with the Redwood edging
being applied
|
and here are the panel blanks after having the
figured Redwood panels glued on
|
|
|
|
|

|

|

|

|
|
The panels are being sanded on my wide belt sander
....... they are curly Redwood and bookmatched to each
other
|
Here I cut the arc in the tops of the
panels
|
and the cut the rebates
|
Here are all 3 panels
|
|
|
|
|

|

|

|

|
|
Last step is to chamfer the panel edge ...... just
to add another dimension
|
Here are the panels ready to be hand sanded
|
and here they are with their first of 4 coats of
oil.
|
There are the pieces that will make up the bent
laminated eyebrow
|
|
|
|
|

|

|

|

|
|
They are sanded to dimension
|
The clued in this form and allowed o cure for 4
days
|
Here is the blank out of the press
|
Then cut to width and sanded ..... and
sanded
|
|
|
|
|

|

|

|

|
|
After machining we have a "sneak" preview as ti its'
proportions ..... Great !!
|
Here are the panels .... the dentil shelf .... and
the eyebrow ..... all be saturated with our varnish
oil.
|
.......whadaythink ?? ..... not bad !!
|
Here the glass is being caulked with a special caulk
(that turns clear) and will be
covered with curved steam bent stops
|
|
|
|
|

|

|

|

|
|
Here are all of the stops laid out and
precut
|
Then we caulk the floating panels and clean up any
squeeze out
|
Here the door will lay flat while the caulk cures
for 3 or 4 days
|
... so I start to layout the eyebrow
|
|
|
|
|

|

|

|

|
|
The redwood eyebrow will be attached with Genuine
mahogany dowels that UI made in shop
|
Then I layout the dentil shelf placement
|
and the dentil posts
|
Then glue the dentil post to the door
|
|
|
|
|
|

|

|

|

|
|
and glue on the eyebrow
|
The dentil shelf is attached with stainless steel
screws but I cap them with wood pins ..... here I am
chiseling the diamond
|
These pins are made from a wonderful reddish wood
called Pao Brasil
|
Here is a close-up of the attached eyebrow
|
|
|
|
|
|

|

|

|

|
|
and here is the door complete
|
and ........... here is the door complete!!
|
These are the same at the top of the page
|
........ enjoy !! ........
|
|
|
|
|
|

|

|

|

|
|
|
|
|
|
|
|
|
|
|

|

|
|
|
|
|
|
|
|
|
|
|
|
|