|
|
|
|
|
|
|
||||||||
|
||||||||||||
|
|
|
|
|
|
||||||||
 |
||||||||||||
|
|
|
|
|
|
||||||||
 |
|
 |
|
 |
||||||||
|
|
|
|
|
|
||||||||
|
|
|
|
|
|
||||||||
 |
|
|
|
 |
||||||||
|
|
|
|
|
|
||||||||
|
|
|
|
|
|
||||||||
 |
|
 |
|
 |
||||||||
|
|
|
|
|
|
||||||||
|
|
|
|
|
|
||||||||
 |
|
 |
|
 |
||||||||
|
|
|
|
|
|
||||||||
|
|
|
|
|
|
||||||||
 |
|
 |
|
 |
||||||||
|
|
|
|
|
|
||||||||
|
|
|
|
|
|
||||||||
 |
|
 |
|
 |
||||||||
|
|
|
|
|
|
||||||||
|
|
|
|
|
|
||||||||
|
|
||||||||||||
|
|
|
|
||||||||||
 |
|
 |
|
 |
||||||||
|
|
|
|
|
|
||||||||
|
|
|
|
|
|
||||||||
 |
|
 |
|
 |
||||||||
|
|
|
|
|
|
||||||||
|
|
|
|
|
|
||||||||
 |
|
 |
|
 |
||||||||
|
|
|
|
|
|
||||||||
|
|
|
|
|
|
||||||||
 |
|
 |
|
 |
||||||||
|
|
|
|
|
|
||||||||
|
|
|
|
|
|
||||||||
 |
|
 |
|
 |
||||||||
|
|
|
|
|
|
||||||||
|
|
|
|
|
|
||||||||
 |
|
 |
|
 |
||||||||
|
|
|
|
|
|
||||||||
|
|
|
|
|
|
||||||||
 |
|
 |
|
 |
||||||||
|
|
|
|
|
|
||||||||
|
|
|
|
|
|
||||||||
 |
|
 |
|
 |
||||||||
|
|
|
|
|
|
||||||||
|
|
|
|
|
|
||||||||
 |
|
 |
|
 |
||||||||
|
|
|
|
|
|
||||||||
|
|
|
|
|
|
||||||||
 |
|
 |
|
 |
||||||||
|
|
|
|
|
|
||||||||
|
|
|
|
|
|
||||||||
 |
|
 |
|
 |
||||||||
|
|
|
|
|
|
||||||||
|
|
|
|
|
|
||||||||
 |
|
 |
|
 |
||||||||
|
|
|
|
|
|
||||||||
|
|
|
|
|
|
||||||||
 |
|
 |
|
 |
||||||||
|
|
|
|
|
|
||||||||
|
|
|
|
|
|
||||||||
 |
|
 |
|
 |
||||||||
|
|
|
|
|
|
||||||||
|
|
|
|
|
|
||||||||
 |
|
 |
|
 |
||||||||
|
|
|
|
|
|
||||||||
|
|
|
|
|
|
||||||||
 |
|
 |
|
 |
||||||||
|
|
|
|
|
|
||||||||
|
|
|
|
|
|
||||||||
 |
|
 |
|
 |
||||||||
|
|
|
|
|
|
||||||||
|
|
|
|
|
|
||||||||
 |
|
 |
|
 |
||||||||
|
|
|
|
|
|
||||||||
|
|
|
|
|
|
||||||||
 |
|
 |
|
 |
||||||||
|
|
|
|
|
|
||||||||
|
|
|
|
|
|
||||||||
 |
|
 |
|
 |
||||||||
|
|
|
|
|
|
||||||||
|
|
|
|
|
|
||||||||
 |
|
 |
|
 |
||||||||
|
|
|
|
|
|
||||||||
|
|
|
|
|
|
||||||||
 |
|
 |
|
 |
||||||||
|
|
|
|
|
|
||||||||
|
|
|
|
|
|
||||||||
 |
|
 |
|
 |
||||||||
|
|
|
|
|
|
||||||||
|
|
|
|
|
|
||||||||
 |
|
 |
|
 |
||||||||
|
|
|
|
|
|
||||||||
|
|
|
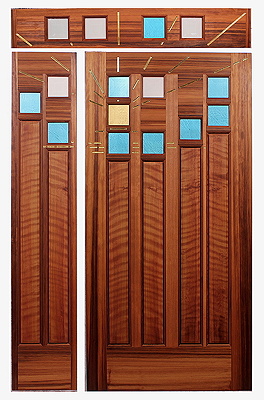
Return to my Door Gallery Return to Doors in Progress |
|
|
||||||||
|
|
|
|
|
|
|
||||||||
|
||||||||||||
|
|
|
|
|
|
||||||||
|
|
||||||||||||
|
|
|
|
|
|
||||||||
|
|
|
|
|
|
||||||||
|
|
|
|
|
|
||||||||
|
|
|
|
|
|
||||||||
|
|
|
|
|
|
||||||||
|
|
|
|
|
|
||||||||
|
|
|
|
|
|
||||||||
|
|
|
|
|
|
||||||||
|
|
|
|
|
|
||||||||
|
|
|
|
|
|
||||||||
|
|
|
|
|
|
||||||||
|
|
|
|
|
|
||||||||
|
|
|
|
|
|
||||||||
|
|
|
|
|
|
||||||||
|
|
|
|
|
|
||||||||
|
|
|
|
|
|
||||||||
|
|
|
|
|
|
||||||||
|
|
|
|
|
|
||||||||
|
|
|
|
|
|
||||||||
|
|
||||||||||||
|
|
|
|
||||||||||
|
|
|
|
|
|
||||||||
|
|
|
|
|
|
||||||||
|
|
|
|
|
|
||||||||
|
|
|
|
|
|
||||||||
|
|
|
|
|
|
||||||||
|
|
|
|
|
|
||||||||
|
|
|
|
|
|
||||||||
|
|
|
|
|
|
||||||||
|
|
|
|
|
|
||||||||
|
|
|
|
|
|
||||||||
|
|
|
|
|
|
||||||||
|
|
|
|
|
|
||||||||
|
|
|
|
|
|
||||||||
|
|
|
|
|
|
||||||||
|
|
|
|
|
|
||||||||
|
|
|
|
|
|
||||||||
|
|
|
|
|
|
||||||||
|
|
|
|
|
|
||||||||
|
|
|
|
|
|
||||||||
|
|
|
|
|
|
||||||||
|
|
|
|
|
|
||||||||
|
|
|
|
|
|
||||||||
|
|
|
|
|
|
||||||||
|
|
|
|
|
|
||||||||
|
|
|
|
|
|
||||||||
|
|
|
|
|
|
||||||||
|
|
|
|
|
|
||||||||
|
|
|
|
|
|
||||||||
|
|
|
|
|
|
||||||||
|
|
|
|
|
|
||||||||
|
|
|
|
|
|
||||||||
|
|
|
|
|
|
||||||||
|
|
|
|
|
|
||||||||
|
|
|
|
|
|
||||||||
|
|
|
|
|
|
||||||||
|
|
|
|
|
|
||||||||
|
|
|
|
|
|
||||||||
|
|
|
|
|
|
||||||||
|
|
|
|
|
|
||||||||
|
|
|
|
|
|
||||||||
|
|
|
|
|
|
||||||||
|
|
|
|
|
|
||||||||
|
|
|
|
|
|
||||||||
|
|
|
|
|
|
||||||||
|
|
|
|
|
|
||||||||
|
|
|
|
|
|
||||||||
|
|
|
|
|
|
||||||||
|
|
|
|
|
|
||||||||
|
|
|
|
|
|
||||||||
|
|
|
|
|
|
||||||||
|
|
|
|
|
|
||||||||
|
|
|
|
|
|
||||||||
|
|
|
|
|
|
||||||||
|
|
|
|
|
|
||||||||
|
|
|
|
|
|
||||||||
|
|
|
|
|
|
||||||||
|
|
|
|
|
|
||||||||
|
|
|
|
|
|
||||||||
|
|
|
|
|
|
||||||||
|
|
|
|
|
|
||||||||
|
|
|
|
|
|
||||||||
|
|
|
|
|
|
||||||||
|
|
|
|
|
|
||||||||
|
|
|
|
|
|
||||||||
|
|
|
|
|
|
||||||||
|
|
|
|
|
|
||||||||
|
|
|
|
|
|
||||||||
|
|
|
|
|
|
||||||||
|
|
|
|
|
|
||||||||
|
|
|
|
|
|
||||||||
|
|
|
|
|
|
||||||||
|
|
|
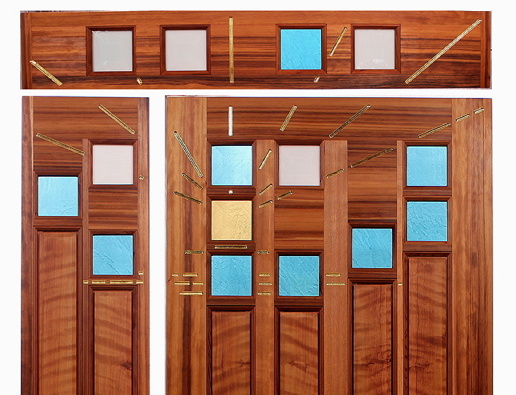
Return to my Door Gallery Return to Doors in Progress |
|
|
||||||||